PNG to JPG Black Background? Choose the Right Fix
Fix a black background after PNG to JPG conversion: check transparency, pick a white or custom background, and learn what a saved JPG cannot restore.
- 1JPEG has no transparency, so a PNG must be flattened onto a chosen background colour during conversion.
- 2Check whether the black is a preview artifact, a saved opaque pixel, or real image content before changing anything.
- 3Re-export from the original transparent PNG with a white or custom background; a JPG that already saved black pixels cannot be fully restored.
If converting a PNG to JPG gives it a black background, start again from the original PNG and explicitly choose a solid background before exporting. Use white for a white-background image, or the colour your destination actually requires. Ordinary JPG files cannot retain transparency; increasing the quality setting will not change that.
But first check that conversion caused the problem. A dark image viewer, a clipboard transfer and an already opaque black rectangle can look similar while needing different fixes. Painting every black pixel white is not a safe shortcut: it can erase lettering, shadows and genuine dark parts of a logo.
This guide separates those cases, shows a browser workflow and explains when you need the original file rather than another converter.
First, identify where the black background appears
Keep an untouched copy of the original PNG and the problem JPG. Open the original in an editor that can display transparency over a checkerboard or a contrasting background. Compare the exported file separately.
| What you observe | What it suggests | Safest next step |
|---|---|---|
| The PNG's empty area changes when you change the viewer background | The area may still be transparent; the viewer supplies the dark backdrop | Keep the PNG intact and choose an explicit export background only if JPG is required |
| The original is transparent, but the exported JPG has a fixed black rectangle | Transparency was flattened or otherwise lost during export | Export a new copy from the original, choosing the background first |
| The original PNG stays black even over contrasting backgrounds | Black may already be opaque image content | Inspect its transparency or layers; find a clean source or edit a mask |
| A saved PNG works, but a pasted copy becomes black | The browser, clipboard or receiving app changed the representation | Insert the downloaded original file rather than relying on Copy image |
| The whole picture becomes dark, not just its empty area | A colour-profile, export or viewer issue may be involved | Compare another viewer and the export colour settings before assuming an alpha problem |
The background comparison is a useful visual check, not a complete alpha-channel audit. Black artwork on a black canvas can disappear visually even when it is valid. Use a contrasting colour and inspect the actual transparency when the result is uncertain.
Also confirm that you are comparing the new download, not an older file with the same name. Browser duplicate filenames and cached thumbnails can make a successful export look unchanged.
A PNG is not automatically transparent
PNG supports transparency; that does not mean every PNG contains transparent pixels. A screenshot saved as PNG is usually an opaque rectangle. An image with a checkerboard drawn into its pixels is not a transparent cutout, even though it resembles one in a search preview.
An alpha value describes how opaque a pixel is. Fully transparent areas allow the background to show through. Partially transparent pixels blend with it, which is how smooth edges and soft shadows can work.
The MDN image-format guide distinguishes PNG's alpha support from ordinary JPEG, which has no alpha channel. GIMP's transparency documentation also explains how to inspect the Alpha channel and export transparent areas.
Even the presence of an alpha channel is not proof of visible transparency: all of its pixels might be fully opaque. The question is whether the area you want to change actually has transparency left.
A concrete transparency check in GIMP
For an original PNG opened by itself, before adding other layers:
- Open Windows > Dockable Dialogs > Channels.
- Look for Alpha below the colour channels. If it is absent, this image has no alpha channel to preserve.
- Inspect the Alpha thumbnail, which you can enlarge by holding the left mouse button on it. White means opaque, black means transparent, and gray represents partial transparency. Locate the area that looks wrong in the image.
- If the Alpha preview is solid white there, adding a background underneath cannot change those opaque pixels. If the area is transparent, return to the original-image workflow below.
This black-and-white preview describes opacity, not the visible colours of the artwork. Read the thumbnail without toggling or editing channels. GIMP's Channels dialog documentation explains both the display and the menu path. In a multilayer project, its colour and Alpha channels describe the combined image, so open the original PNG separately for this check.
Why PNG-to-JPG export changes the background
For a conventional JPG, the final picture must be opaque. A converter has to produce actual colours where the source was transparent. Different export paths handle this differently, so there is no universal rule that every PNG-to-JPG converter will choose black or white.
The operation you want is background compositing: blend the source over your chosen solid colour, then export the opaque result. This handles partially transparent edges as well as fully empty areas.
Merely discarding alpha data is not the same operation. And a white background supplied by the editor interface or web page is not necessarily part of the exported image.
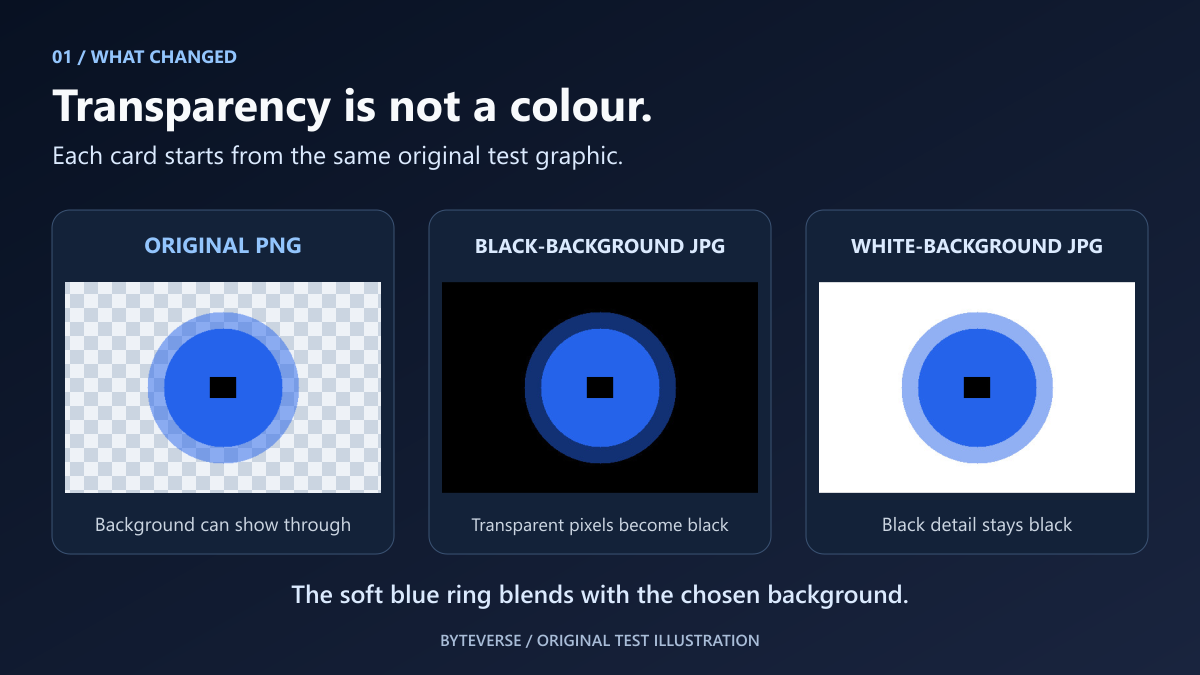
What the original test showed
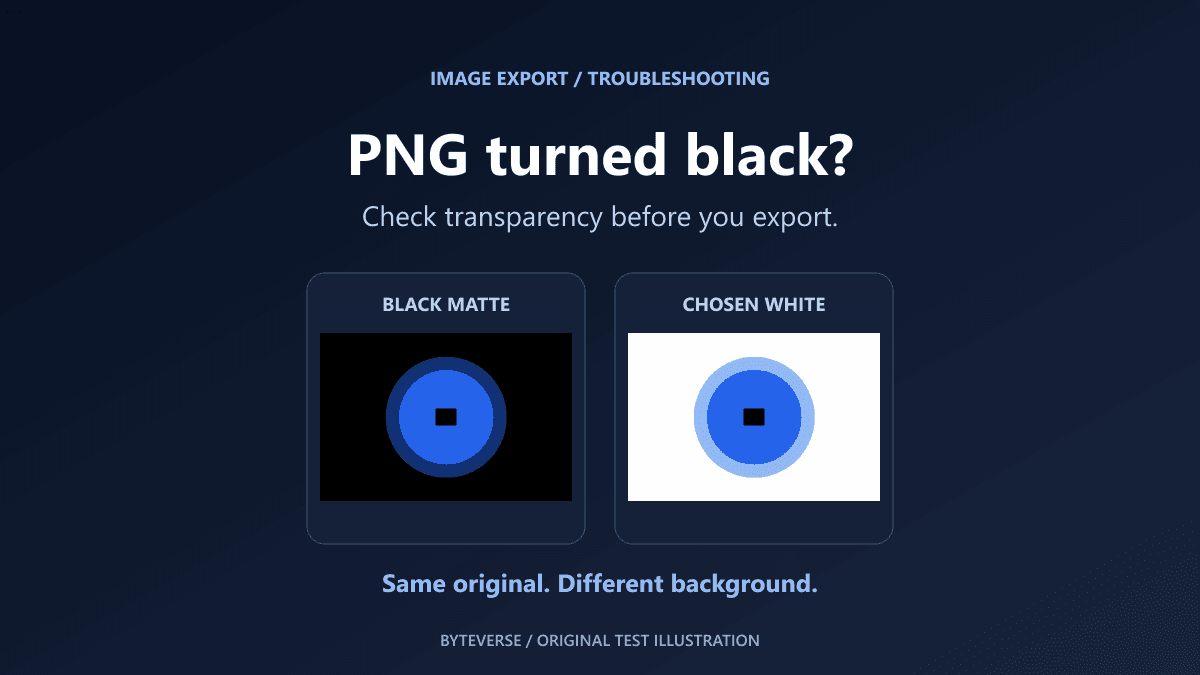
For this guide, we created a 480 × 320 synthetic PNG with a blue shape, a partially transparent blue ring and an opaque black detail. We tested the current ByteVerse controls in desktop Edge, downloaded the outputs and decoded their pixels independently.
| Same source, different export | Empty-area result | Real black detail |
|---|---|---|
| JPG with an explicitly white background | Opaque white | Remained black |
| JPG with an explicitly black background | Opaque black | Remained black |
| PNG with transparency retained | Still transparent | Remained black |
The ring also changed appearance between white and black backgrounds because it was partially transparent. That is expected blending, not evidence that its blue colour was randomly replaced.
A separate browser Canvas test reproduced another trap: setting the CSS background to white did not fill the canvas bitmap. Its JPEG export had black in the initially transparent corner. Painting a real white rectangle into the bitmap before drawing the PNG produced a white corner instead. MDN documents that Canvas export serializes the bitmap, not the surrounding page's appearance.
These are controlled examples, not a claim that every editor behaves identically. The original file remained unchanged, and the browser test allowed only application assets—not image-upload requests.
Fix the export in your browser
If the original PNG still contains transparency, the ByteVerse image compressor and converter lets you choose the JPG background explicitly. The controls below were checked on October 13, 2026.
- Add the original PNG. Do not start with the JPG that already has the unwanted black rectangle.
- Choose Quality mode for a format conversion without a maximum file-size target. Leave resizing off if you want to preserve the source dimensions.
- Select JPG under Convert to. The JPG options appear under Quality & advanced options.
- Under Transparency & JPG background, select I allow transparent pixels to be flattened for JPG. The tool blocks a transparent-to-JPG batch until you approve this change.
- Set JPG background color to white,
#ffffff, or to the specific colour you need. A white choice is not suitable if the intended result is a transparent logo for several page backgrounds. - Select Compress images, inspect the result and choose Download image. Reopen the downloaded file to check its background and fine detail.
The checkbox authorizes the change; the colour control determines the replacement background. Both matter. Choosing white does not recolour an opaque black object or an already baked black rectangle.
In the tested workspace, changing settings clears previous outputs so the next download matches the current settings. Compress again after changing the background. For a batch, remember that the shared background colour applies to every JPG output; inspect different kinds of images before exporting the whole ZIP.
The tool's comparison reference includes the same flattening background as the output. It is useful for judging compression, but it is not evidence that the JPG still has the original PNG's transparency.
If you later need a file-size limit, switch to Target mode and enter the maximum. Check both the measured size and the appearance. A successful size target cannot confirm that a portal accepts the picture's dimensions, background or content.
Use an image editor for a controlled background
You do not need an AI background remover when the source already has clean transparency. In a layer-based editor, put a solid-colour layer under the original graphic, inspect the combined image, then export a new JPG.
For a simple imported PNG in GIMP 3, the official documentation supports this alternative:
- Open the original file and keep the source unchanged.
- Click the background-colour swatch in the Toolbox's overlapping foreground/background colour pair and choose the desired colour. This is the painting/fill colour control, not the visible canvas padding; see GIMP's colour-area guide.
- Select the relevant image layer and use Layer > Transparency > Remove Alpha Channel. GIMP documents that the transparent areas are replaced with the current background colour.
- Use File > Export As, choose a new JPG filename, and inspect the result. Save a separate editable project if you need to keep working with layers.
For multilayer artwork, adding a solid background layer beneath the artwork is usually easier to reason about than changing individual layers one by one. Do not flatten your only editable master.
These GIMP instructions are documentation-checked, not a claim of a hands-on GIMP session. See Remove Alpha Channel and Export File for the application-specific behavior.
If the rectangle is fixed but the edges still look dark
A dark or pale fringe needs closer inspection than a background colour change.
The edge may already contain a matte. If a cutout was previously blended onto black, its edge colours may already be darkened. Adding a white layer underneath an opaque edge does not restore the earlier colours or transparency.
The mask may be rough. A hard selection can create jagged edges; a poor soft selection can leave a halo. Revisit the cutout or layer mask in the source project, and compare it against both light and dark backgrounds.
JPEG compression can change sharp edges. Small text and logos may develop ringing or colour artifacts. Increasing quality may improve that compression artifact, but it cannot reconstruct transparency or repair a contaminated mask. If JPG is not compulsory, a PNG may be a better delivery format for this kind of graphic.
Do not use a global “replace black with white” operation as a general repair. In our synthetic example, it would also change the intentional black detail. In a real logo it can damage outlines, letter interiors, shadows and product details.
If cleanup genuinely requires a new mask or background removal, the photo-editing workflow guide is a separate next step. Treat generated or inferred edges as edits to inspect, not as proof that lost original pixels have been recovered.
If you only have the black-background JPG
Changing it back to PNG will not restore the missing transparency. PNG can store transparency, but a format conversion cannot know which black pixels belonged to the original subject and which came from the export background.
Try these options in order:
- Find the original transparent PNG, editable design project, version history or backup.
- Ask the creator for a transparent export if you received only a flattened copy.
- If no source exists, make a copy and create a new selection or mask manually, or use a suitable background-removal tool and inspect every important edge.
Reconstruction can be reasonable for a simple solid shape, but fine hair, soft shadows, translucent materials and dark objects against black are harder. There is no general lossless recovery from a single flattened JPG.
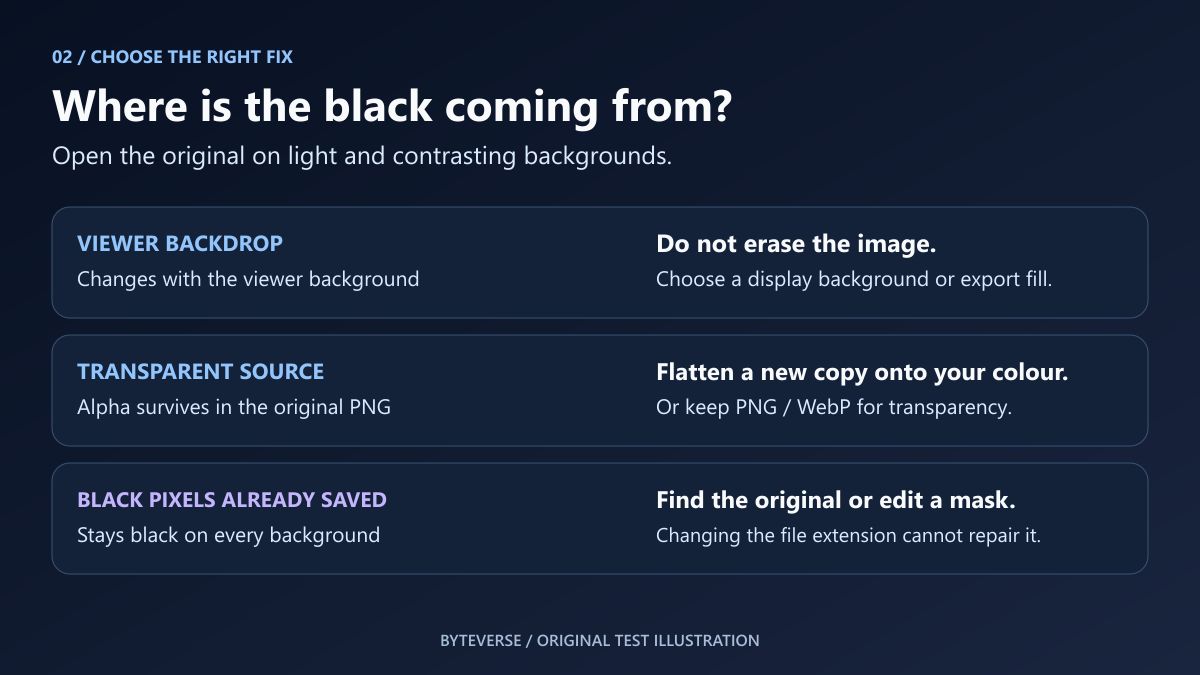
Choose the final format after fixing the background
Use JPG when an opaque image is required and the destination accepts it. Keep a clean PNG or editable source for future exports.
Use PNG when you need transparency and precise graphic edges. WebP can also preserve alpha for supported workflows; changing to WebP does not automatically remove an opaque background. Check the receiving application rather than assuming browser support means every upload form accepts the format.
For dimensions, compression and web delivery, continue with the image-optimization guide. Those are separate decisions from whether a background is transparent or permanently part of the picture.
Before sending the final file, check:
- The background matches the intended destination.
- Genuine black details and small text are intact.
- Edges look acceptable at normal display size and at a closer zoom.
- The actual downloaded format, dimensions and file size meet the destination's rules.
- The original transparent or layered source is still available.
The reliable fix is to choose the background while transparency still exists. Once the black rectangle becomes ordinary pixels, another quality slider or file extension is not a substitute for the original.
Frequently Asked Questions
Why does my PNG look black even before conversion?
The viewer may be showing a dark background through transparent areas, or the file may already contain opaque black pixels. Check it on contrasting backgrounds and inspect its transparency before changing the image. A PNG extension alone does not prove that its background is transparent.
Can a JPG have a transparent background?
An ordinary JPG cannot store an alpha channel. Use PNG or another format with transparency support when the receiving application accepts it. If JPG is required, choose the solid background before export and keep the transparent source separately.
Will converting a black-background JPG back to PNG fix it?
No. The conversion preserves the existing opaque image; it does not recover the alpha values lost during the earlier export. Start with the original transparent file, or create a new mask and inspect the result if the source is unavailable.
Why does copying a PNG produce black when inserting the file works?
Copying can use a different clipboard representation from inserting the saved file, and support varies between the source and destination apps. Save the original and insert it directly, then compare. This symptom does not prove that the original PNG itself is damaged.
Does a higher JPG quality setting prevent a black background?
No. Quality affects JPEG encoding, not whether the output can store transparency. Choose the correct solid background first. Higher quality may reduce compression artifacts, but it cannot undo an already flattened background or rebuild the original mask.
Verification Notes
Checked October 13, 2026. The original synthetic image, browser Canvas example and public ByteVerse workflow were tested in desktop Edge 155. Downloaded JPG and PNG pixels were decoded independently; white and black export choices, retained PNG alpha, the genuine black detail and the unchanged original were checked. Only static application or codec requests were allowed during the tool test.
The comparison artwork uses the same original test fixture with independent JPEG exports; it is an explanatory illustration, not a screenshot or a promise of a particular compression ratio. These tests do not cover every photo, browser, colour profile or device. GIMP behavior is documented above; Photoshop, clipboard transfers and physical phones were not tested for this guide.
Sources and Image Credits
- MDN: Image file type and format guide
- GIMP 3: Saving Images with Transparency
- GIMP 3: Remove Alpha Channel
- GIMP 3: Export File
- Sharp: flatten operation, used for independent reference compositing and decoded-pixel inspection.
- MDN: Canvas toBlob
- GIMP 3: Channels Dialog
- GIMP 3: Toolbox Colour Area
Cover, comparison and decision-map artwork: original ByteVerse illustrations made for this guide. The synthetic graphic contains no user photograph, signature or third-party artwork.
Share this article
Written by
Ali RehmanAuthor at ByteVerse
A Full Stack Developer and Tech Writer specializing in React.js, Next.js, and modern JavaScript, sharing insights on web development, frontend technologies, backend APIs, and scalable applications.
View all posts